Friday, December 13, 2013

Faux Fireplace

Faux Fireplace

I'm excited to say that most of the work is done on my faux fireplace that I've been building. I've got one coat of paint on and haven't decided yet what to use for the finish coat. I painted the bare wood with one cup of "swiss coffee" flat paint and 2 tablespoons of plaster of paris.  I don't have great carpentry skills, but I'm good at figuring things out and following directions. Always have. I was the kid who cut up the cereal boxes and made the Captain Kangaroo craft projects.

I found this plan on Blue Roof Cabin where Mimi did a wonderful job explaining how she built hers. The pdf plans are available from Ana White.  Give it a try if you like projects and have a wild handy streak. I just love mantels and wanted one before Christmas.

Here's how I got started:
Hauling the lumber home!

My only space big enough to lay out the boards. I used glue, lots of glue!

 I glued, then clamped. I found that I didn't use very many nails, the glue is strong.

 In retrospect, I wish I had bought a higher grade of pine. I had a lot of knots and imperfections. One of the vertical boards (on the left) developed a slight crack. No worry, I got out the glue and clamps. This photo shows the final boards going on, along with wood putty then sanding.

One of the most difficult parts was cutting the miter for the crown molding. 
This side came out great but the other side needed a lot of putty.

Monday, October 14, 2013

Fun with Chalkboards

I always loved the pictures of people that used a chalkboard message. I was finally inspired to build one with some old fence wood from this tutorial Reclaimed Fence Projects. I had never tried using the spray chalkboard paint, it seemed  like a great idea but I was never quite sure how it would work. Well, let me tell you, it's easy, effortless and works wonderfully. I wouldn't hesitate to use it on any surface.

Old frame without glass! Re-use it as a chalkboard.
My first attempt was using an old frame that didn't have the glass anymore. I painted the frame to freshen it up. Next I cut a piece of 1/4" plywood to fit the opening. Next I sprayed with chalkboard paint and let it dry overnight. The next morning I put a final coat on. After letting that dry, I followed the directions to rub chalk all over the board to "prime" the board, then wipe it clean. I nailed the chalkboard to the frame using brads and also some glue.

 Fun with a larger chalkboard.
 Ok, now I was ready to use some old wood to make a frame. This worked out great! The easy method of nailing and gluing  the board to the back of the frame was so quick and effortless. No need to miter corners or worry about using a router.  I decided to just leave this larger one unpainted, I ran out of time before my granddaughter's birthday party.

The ideas are unlimited!

Wednesday, June 19, 2013

Dear Photograph

I'm in love with the concept of "Dear Photograph".  Ever since I've known about this photographic technique of taking an old photograph and holding up in the original location, it has sparked my interest. In December of 2012, I found an old Polaroid picture of my niece and nephew sitting on the front steps, shadowed by my brother Steve's dog.  The day was steamy and hot, so they had a bucket of cold water that cooled their toes. Thirty five years later, I hold the precious picture in my left hand and balance the camera with my other hand carefully aligning the door lines. SNAP!

 
Dear Photograph,
Thirty-five years later and the sun still shines down warming the steps and hearts of this memory.
Susan

Saturday, May 25, 2013

Pizza "No Dough"

I'm always on the lookout for "low carb" or "wheat free" recipes that are easy and taste great. Here's a terrific, easy way to make pizza using cream cheese, eggs and cheese. It's pretty good! I ate one whole row tonight.
Sizzling, just out of the oven! Here's how I made it.

8 oz. of cream cheese (softened at room temperature), 2 eggs, 1/4 cup parmesan cheese, dash of crushed pepper, maybe garlic salt or powder if desired.


Mix using hand held or regular mixer. 

Spray a 9"x12" pan with oil. I used this metal pan but a glass baking pan will also work.

Spread evenly in pan.
Bake at 350º for 20 minutes or until golden brown.
 Let cool for about 15 minutes.
You'll need 1 cup of your favorite tomato sauce, 1 1/2 cups of shredded mozzarella cheese and toppings of your choice. (pepperoni, sausage, hamburg, ham, peppers, onions, olives, mushrooms, or whatever)
Spread the tomato sauce on top.


Sprinkle the mozzarella cheese evenly over the sauce then add topping.  I used pepperoni as you can see. YUM!


Bake for 15 minutes at 425º.
Bake at 425º
Set the timer for 15 minutes!


Looks good enough to eat right now . .  but let it cool a bit.

Delicious!
Ok, I just finished that whole row.


Pizza "No Dough" Recipe

Crust:
1 (8 oz) cream cheese, room temperature (use the full fat type)
2 eggs
1/4 cup grated Parmesan cheese
Black pepper and garlic powder to taste

Preheat oven at 350º. Spray a 9 x 12 or a circular pizza pan with cooking oil spray.  Mix the cream cheese, eggs, Parmesan cheese and spices until well combined. It's best to use a mixer. Bake for 15 - 20 minutes or until golden brown. Cool for about 15 minutes.

Topping:
1 cup tomato sauce (use your favorite pizza or spaghetti sauce)
1 1/2 cups of shredded mozzarella cheese
Toppings of your choice: choose from pepperoni, hamburg, sausage, ham, onions, mushrooms, peppers,etc.

Increase oven temperature to 425º. Spread the sauce evenly on crust. Top with cheese and toppings. Bake for 10 minutes or until cheese is melted. Cool and enjoy!

Printable Version

Wednesday, February 13, 2013

Snowbound! Blizzard of February 1, 2013

It started late afternoon on Friday and didn't stop until Saturday mid morning!  
Strong winds, huge drifts and a final 30" in most places in Connecticut.

 Just having some fun while shoveling for 3 days in a row.


 Luckily we had a few days warning, so I stocked up on food and other necessities. 
I even parked towards the end of the driveway since I would be shoveling.


I trudged through the snow which was up to my thighs, and I'm tall!


Finally a path to the door!


The snow is piled up against the sliding glass door.


Snowshoers make their way down the unplowed street.  Two days later a plow made a single car path down the middle. Unbelievable, there's just too much snow and no place to put it. 

Wednesday, January 16, 2013

I Just Love Cake Mix Recipes

Start with an angel food cake mix & 14 oz can of blueberry pie filling.


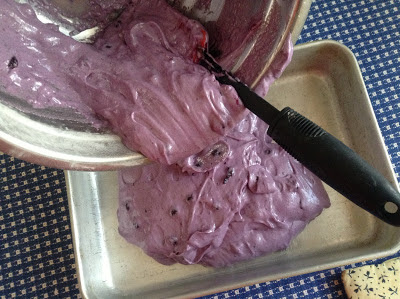
Mix! Don't add anything else.
Pour into a 9 x 13 baking pan.
Set the oven for 350°

Bake for about 28 minutes

Put the damn thing in the oven . . . mine's kind of a dirty oven.
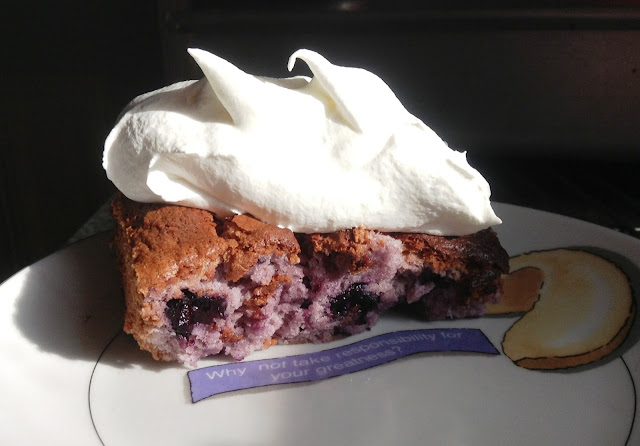
Oh, I left mine in too long while I was playing fiddle tunes.
Add a whipped cream topping & enjoy!