Sunday, November 20, 2016

Snowman Logs


I'm so inspired to make these funky, cute snowmen from discarded logs. I used some really old, wormy, beat up pieces that were laying around my yard. This wasn't the best idea since there were creatures still living inside! My friend, Linda gave me a few "newer" logs from her woodpile and I was on a roll. Don't worry, I baked the older wood in a low oven for a few hours, that should do it!


I started with 3 1/2" to 4" or so logs and cut them on my miter saw at 2" thick. Please be careful and don't cut right to the end. Give yourself enough room to hold on and keep your hands far enough away from the saw.  Next I cut a smaller diameter log, about 3" or so, then repeated with whatever I had. No time to be fussy, these are rustic.


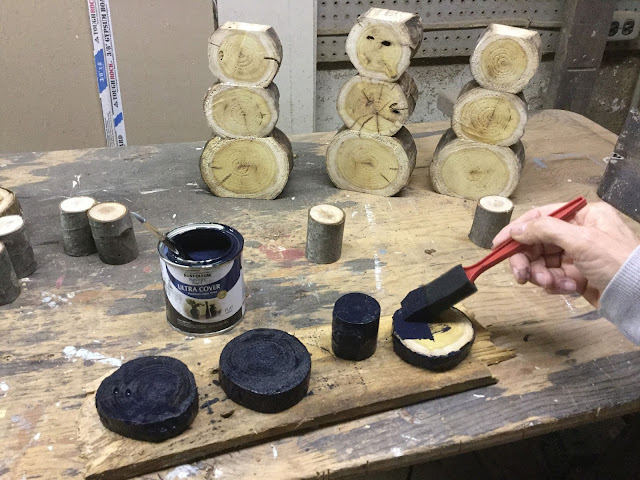
The hats were cut from the smaller diameter logs, also 2" thick. The brims were about 2 1/2 - 3" diameter but cut about 3/4 - 1" thick. I'd say use whatever you have. I chose to paint them black but I left one or two natural.


Wednesday, August 10, 2016

Wonderful Outdoor Piano Bench

At home in my back yard flower garden!

A friend of mine had their deck floor replaced and she asked me if I wanted any of the scrap pieces. I certainly have a reputation of taking any "stuff" to re-use. There were various sizes of 5/4" thick x 6" wide pressure treated wood, mostly in various lengths, ranging from about 14" to 26" long.

I needed an outdoor bench! I looked around the internet and my Pinterest collection and found a great plan from Artsy Chicks Rule. This is exactly what I wanted since it uses the top boards that run the width of the bench. Oh, now what about if I make the 2x4 frame to accept 8 boards, I'll have an octave and paint them like piano keys. I used the legs from an old footboard in the front and 4x4 scraps for the back legs. I'm so pleased and it's such a fun place to sit.

2x4 frame, I used some really old wood!

Bench frame assembled with fancy front legs from a footboard.

Organizing and painting the "keys"

Black keys = sharps & flats!

Painting the frame with leftover exterior paint from my shutters.

It's right at home among the summer flowers.

The petunias are taking over!


Saturday, March 19, 2016

First Race!

Here's the deal. I was getting chubby and eating too much of the wrong foods. After my doctor told me that my cholesterol was close to 300, I decided to change my ways. I gave up chips, cookies, crackers, cake, candy - well you get the idea. I just ate REAL food and was careful about what was in the ingredients. No high fructose junk, bad oils, GMO's, sugar or prepackaged convenience foods. Oh, and definitely no fast food stops!


So, this started the first week of September 2015 and the weight began to come off. Fast forward to the middle of January 2016 and I decide to start walking and get some serious exercise. OK, we all walk but really making an effort to walk three times a week for two miles each time.  Cold weather, snow or wind didn't stop my walk. Now I want to jog. I looked on the internet for running advice and tried to follow a pattern but it progressed too fast. What the hell, I can barely run 15 seconds. I kept at it, and after a few weeks I found some really sound advice. http://www.runnersworld.com/ask-coach-jenny/the-worlds-simplest-learn-to-run-program

Follow your body!
Warm up with five minutes of walking.
Run and walk by your body.
Alternate running (until you hear your breath) & walking until you catch your breath.
Stick with just 20 minutes of running time, 3 days a week.
Stay happy, don't push yourself, keep it easy. No pain.
Finish with a 5 minute cool down, just walk.

Now I decide to enter the Shamrock Race, the two mile run. After all, how many women in their 60's will compete? Seriously, I was just happy that I was able to give it a try, my running time was pretty close to the last year's 3rd place winner. How did I do? Yes, I came in 3rd place on March 19th. I ran as long as I could, then I walked until I caught by breath. It only took a half dozen steps. I finished two miles in 22:26, complete with an award and pictures taken at the end. Success! I'm 40 pounds lighter and getting stronger and healthier each day. I plan to work hard at maintaining the exercise and eating habits. Wish me luck!


Friday, February 12, 2016

Make a Chalkboard Heart DIY Easy!


I decided to make some chalkboard message boards in a heart shape, perfect for the upcoming Valentines Day. The rustic board hearts that I usually make wouldn't work for a smooth surface, so I purchased 1/2" MDF (medium-density fiber) board. It's a wonderful smooth surface and cuts like "butta". Perfect for this project. I went to the local big box store and purchased a 2' x 4' sheet for $9.95. Just the right size to lug home and cut out eight 12" hearts. I found a heart shape that I liked, approximately 12" high and wide then printed it out. I copied it onto cardboard so I could easily trace it and re-use it. Then I used my jig saw to cut them out.

Using my jigsaw to cut out the hearts
After cutting the hearts out, I lightly sanded them, mostly to cover any uneven spots due to my cutting, ha ha. I made sure to sand the edges, too. I decided to make my own chalkboard paint because I had a great barn red paint already on my shelf plus I wanted red on one side and black on the other. The formula that I use is 1 tablespoon of unsanded grout mixed with 1/2 cup of latex paint. You can purchase a 2' x 4' chalk board piece already with the chalkboard surface on one side but it's only 3/16" thick. I didn't think this was thick enough for the hearts, but it would be wonderful for signs and framed chalkboards.

Hearts painted on one side & edges with red paint.
I wanted one side to have a traditional black chalkboard so after painting two coats of red, I flipped them over and carefully painted two coats of black chalkboard paint. Be careful not to get the black paint on the red! After letting the paint dry overnight, I very lightly sanded both sides and edges. My next step was to prime the chalkboard surface by laying a piece of chalk on its side and cover it completely with chalk on each side. I take a rag and rub it onto the surface then wipe it off. Now you're ready to write!

Priming the new surface with chalk

All primed and ready to wipe off.

Next I was ready to drill some holes for hanging. After some thought, I decided that I liked the way two holes looked, measured and punched the holes in my cardboard template.

I used a 1/4" drill bit to make the holes for the ribbon hanger.
I found some pretty white ribbon with wire edges and fed it through the holes. I tied a bow that can be used at the top or on the heart itself. Here's the finished pictures.

All finished a ready for gift-giving!
I tried one with a one-hole approach & jute rope!